Why it matters
A useful improvement starts with a continuous boundary around the conditioned space. Extra material in one place may leave gaps elsewhere. The worksheet below separates what is known from what needs inspection, so an upgrade can be specified as a complete assembly.
What you’ll need
Tools
- Pencil and building-section sketch
- Existing product labels or specifications
- Notebook
Materials
- Local energy and building requirements
- Records of previous alterations
Before this skill
- Shed Planning Principles
Before you begin
Safety & limits
- Work from drawings and accessible finished rooms. Do not enter attics or wall cavities, disturb unknown insulation, or open electrical fixtures. Suspected asbestos, mould, wiring hazards and damp assemblies require qualified assessment. Insulation work must preserve fire clearances, ventilation and escape provisions.
Work carefully, in order
The method
- 01
Draw the conditioned space
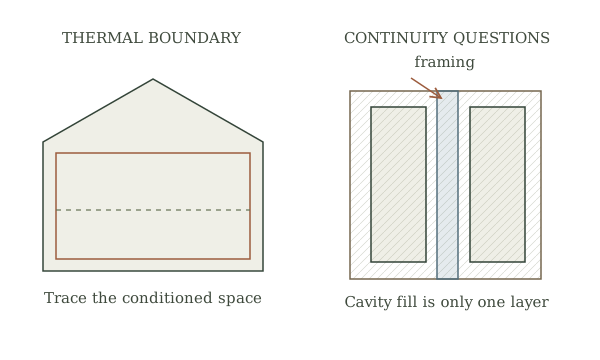
On a section, outline the rooms intentionally heated or cooled. Trace the boundary across walls, ceilings and floors; distinguish an unconditioned roof space or crawlspace. Circle each place where the line becomes uncertain. Your output is a marked drawing, not an instruction to fill a cavity.
- 02
List known insulation
Make columns for location, product, thickness if documented, stated R-value and evidence. R-value describes resistance to heat transfer; use compatible units when comparing labels. Leave concealed layers unknown. A product label alone does not describe the performance of the whole wall.
- 03
Separate heat-flow routes
Sketch heat crossing a material, air carrying heat through a gap, and radiant exchange. Insulation and air sealing address different routes. Mark framing, corners and openings as continuity questions rather than assuming that cavity fill solves every loss. Compare these observations with the section.
- 04
Coordinate the assembly
Ask the designer to identify insulation, the air-control layer, water management and the climate-appropriate vapour-control strategy. Record how they meet at windows and roof edges. Do not choose the side of a vapour barrier from a generic diagram; the actual climate and wall construction matter.
- 05
Write a retrofit brief
List comfort concerns, known dampness, uncertain layers and the areas needing assessment. Request an assembly specification, suitable product instructions and a ventilation review before work. Agree how installation quality and concealed junctions will be checked; record the final drawings for future maintenance.
Mistakes to avoid
- Confusing insulation with air sealing
- Comparing R-values in different unit systems
- Specifying a vapour barrier without an assembly assessment
If it isn’t working
One patch stays cold or hot
Record its location and weather; ask an assessor to investigate continuity and air leakage rather than adding material blindly.
Dampness appears after an upgrade
Have the moisture source and altered assembly assessed promptly; more insulation is not a moisture diagnosis.
Then & now
Historical context
Older households relied on clothing, limited heated rooms and local materials. Those habits help explain a building but do not establish the suitability of a modern retrofit.
The modern equivalent
A documented building-envelope assessment and coordinated energy retrofit.
Sources & review
Editorial draft — specialist review pending. Written 2026-09-30. Sources support the stated scope; this page has not been professionally certified.
- US Department of Energy — Heat Flow ↗
Heat transfer and the thermal boundary; conceptual guidance rather than a retrofit specification. Checked 2026-09-30.
- US Department of Energy — Types of Insulation ↗
Product forms and R-value; actual assemblies need local assessment. Checked 2026-09-30.