Why it matters
Masonry is a system of units, joints and support. Reading the pattern and documenting its condition are useful first skills. A tabletop exercise builds vocabulary without risking a standing wall or pretending that a bond pattern establishes structural capacity.
What you’ll need
Tools
- Pencil, ruler and notebook
- Camera for safe ground-level observations
- Level for the tabletop exercise
Materials
- Lightweight rectangular wooden or card blocks
- Existing drawings, where available
Before this skill
- Shed Planning Principles
Before you begin
Safety & limits
- Use lightweight model blocks, not heavy units stacked overhead. Stay clear of leaning walls, loose masonry and unstable chimneys. Do not cut, grind, rake joints or dismantle a wall during this exercise. Dust exposure, temporary support, structural work and heritage permissions require qualified planning.
Work carefully, in order
The method
- 01
Name the visible parts
On a photograph, label the masonry units, horizontal bed joints and vertical joints. Mark a course as one row. Distinguish a visible face from hidden wall thickness and support; appearance alone cannot identify a load-bearing wall. Note what the photograph cannot reveal.
- 02
Lay out a dry model
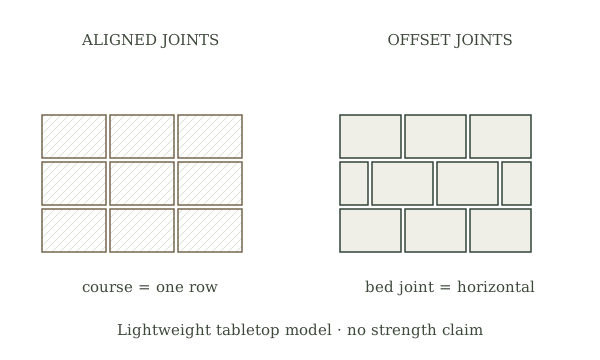
Place lightweight rectangular blocks in two rows on a flat table. First align the vertical joints, then offset the upper row. Compare the joint lines and sketch the two patterns. Keep the model low and unbonded; it demonstrates geometry, not a construction specification.
- 03
Practise reference checks
Choose a straight reference edge for the model. Check row alignment with a ruler and level; compare the ends before moving individual blocks. Write down which check concerns level and which concerns alignment. Do not transfer tabletop tolerances or spacing to a building.
- 04
Record condition and water routes
From a safe position, photograph cracks, missing joints, staining and nearby roof outlets. Add dates and locations without probing. Repointing replaces deteriorated joint mortar, but cannot cure an unresolved leak or movement. Keep suspected causes separate from observed facts.
- 05
Request a compatible repair plan
Ask a qualified mason or conservation specialist to assess the units, existing mortar and cause of damage. Compatibility includes permeability and strength, not colour alone. Obtain a suitable specification and supervised sample before repair; do not select the hardest bagged mortar by default.
Mistakes to avoid
- Treating a decorative bond as proof of strength
- Repointing before investigating water or movement
- Matching mortar only by colour
If it isn’t working
The model rows wander
Reset the reference line and compare the ends before changing individual blocks.
Cracks or loose units are visible
Keep clear and request assessment; do not attempt to stabilise them by filling visible gaps.
Then & now
Historical context
Brick and stone traditions combine local units with different binders and joint finishes. Changes in mortar technology mean similar-looking buildings may need different repairs.
The modern equivalent
Masonry condition mapping, specified compatible materials and supervised craft training.
Sources & review
Editorial draft — specialist review pending. Written 2026-09-30. Sources support the stated scope; this page has not been professionally certified.
- National Park Service — Preservation Brief 2 ↗
Diagnosing deterioration and selecting compatible mortar for historic masonry. Checked 2026-09-30.