Why it matters
Texture describes the mineral particles; structure describes how they assemble into crumbs. These are different properties. A clay-rich soil can have good structure, while sandy soil can still be compacted. This field exercise guides questions about drainage and cultivation, not fertilizer dosing.
What you’ll need
Tools
- Trowel
- Tray
- Notebook
Materials
- Soil sample
- Water
Before you begin
Safety & limits
- Wear gloves on unknown ground. Suspected contaminated soil needs appropriate testing before food growing.
Work carefully, in order
The method
- 01
Take representative samples
Choose several spots in the intended bed. Brush aside mulch and take a little soil from the root zone, keeping unusual wet spots separate. Remove stones and large roots. Label each sample before adding water so your observations remain connected to a place.
- 02
Moisten gradually
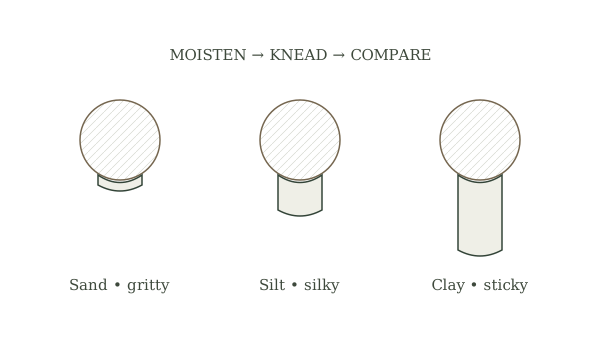
Add water a few drops at a time and knead. Aim for a putty-like consistency, not a slurry. Dry aggregates can feel like sand until they soften; give the sample time and work it thoroughly before judging the particles.
- 03
Feel and ribbon
Rub a pinch between finger and thumb: grit suggests sand, smooth flouriness suggests silt, and stickiness suggests clay. Press a moist ball into a thin ribbon over your finger. A persistent ribbon suggests more clay than a sample that falls apart immediately.
- 04
Compare and record
Describe grit, smoothness, stickiness, and whether a ribbon forms. Repeat with the other samples under similar moisture conditions. Use a recognized texture-by-feel key for formal classification. Do not assign exact percentages from this exercise.
- 05
Connect to a decision
Observe the same bed after rain. Record pooling and how easily a fork enters when the soil is moist. Combine these observations with a laboratory soil test before adding lime or fertilizer; texture alone cannot reveal acidity, nutrient supply, or contamination.
Mistakes to avoid
- Testing mud instead of moist soil
- Calling every dark soil fertile
- Adding sand to clay without a soil-management plan
If it isn’t working
Everything feels gritty
Soften and knead longer; check that you are feeling particles rather than dry clods.
Samples disagree
Map distinct zones instead of averaging away a drainage problem.
Then & now
Historical context
Hand assessment remains useful alongside laboratory testing because it can compare many points in a field quickly.
The modern equivalent
Laboratory particle-size analysis measures texture more precisely; a soil test adds chemical information.
Sources & review
Editorial draft — specialist review pending. Written 2026-09-20. Sources support the stated scope; this page has not been professionally certified.
- USDA NRCS — soil texture ↗
Supporting reference; see the original for its complete procedure. Checked 2026-09-20.