Why it matters
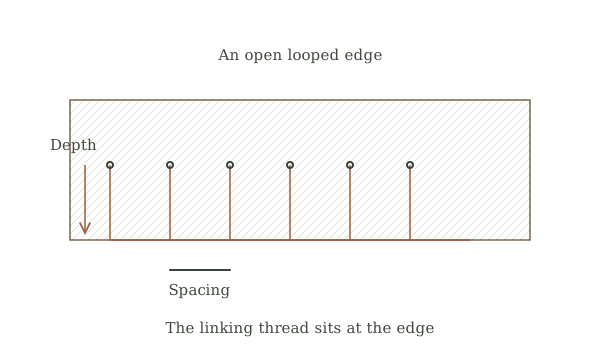
Blanket stitch links upright stitches with a thread line along the edge. That line organizes and supports the edge while leaving a visible decorative rhythm. It is useful on felt and stable folded fabric, but widely spaced loops alone cannot stop a very loose woven fabric from unraveling.
What you’ll need
Tools
- Needle
- Scissors
- Ruler
- Fabric marker
Materials
- Stable felt or folded fabric scrap
- Suitable thread
Before you begin
Safety & limits
- Keep needles out of mouths and away from children and pets. Do not use this decorative repair on safety equipment.
Work carefully, in order
The method
- 01
Choose and mark the edge
Start on a straight scrap of firm felt or a neatly folded woven edge. Choose thread that passes through the material easily; thick embroidery thread is not automatically better for a thin garment. Mark a light line for stitch depth and evenly spaced points along it. An oversized practice sample helps you see the structure before reducing it to garment scale.
- 02
Anchor the thread
Secure the thread with a small knot hidden between layers or a few anchoring stitches in sound material. Bring it to the edge at the start of the row. Hold the work so the free edge remains visible and the fabric lies relaxed. Leave room to move your fingers rather than pinching directly where the needle will emerge.
- 03
Form an open loop
For each stitch, put the needle through the fabric at the marked depth a short distance along the edge. Draw the thread toward the free edge, leaving an open loop instead of pulling everything tight immediately. Pass the needle through that loop so tightening leaves a vertical leg with the linking thread seated along the edge.
- 04
Repeat without cinching
Continue at the marked spacing, keeping the working thread beneath the needle as the next loop forms. Stop every few stitches and lay the sample flat. Adjust a loose loop while it is still accessible. A sharply curled edge means too much tension, not a need for more stitches. At a corner, place the turn deliberately rather than dragging a long thread diagonally across it.
- 05
Secure the last loop
Make a small holding stitch across the final edge loop so it cannot slide open. Secure the end on the reverse and trim. Compare the upright legs and the edge line, then gently flex the fabric. For a real repair, check that the seam or backing carries the required strain; an attractive border should not be mistaken for reinforcement of missing cloth.
Mistakes to avoid
- Using open blanket stitch as the only finish on rapidly fraying cloth.
- Allowing the edge line to drift onto the face because the loop is pulled in the wrong direction.
If it isn’t working
One loop has become much larger
Loosen the most recent stitch and reset the loop before adding more.
Fabric tears at the holes
Use a finer needle or stronger backing and avoid crowding stitches into damaged material.
Then & now
Historical context
Blanket stitch has served as both edging and ornament in surviving textiles from different regions and periods. The name describes a useful family of looped edges, not a requirement to work only on blankets.
The modern equivalent
Machine overcasting and binding are alternatives for long or fraying edges. Closely worked buttonhole techniques are related but should be selected for an actual buttonhole rather than assuming this open border is equivalent.
Sources & review
Editorial draft — specialist review pending. Written 2026-09-21. Sources support the stated scope; this page has not been professionally certified.
- Royal School of Needlework — blanket stitch ↗
Linked loop structure, edge spacing and securing the final loop. Checked 2026-09-21.