Why it matters
A hem encloses a vulnerable cut edge and sets a garment’s finished length. The finished fold and the cutting line are different: cutting at the desired finished length leaves no cloth to turn under. Fitting and temporary stitching prevent a small measuring mistake from becoming an irreversible cut.
What you’ll need
Tools
- Needle
- Scissors
- Ruler
- Fabric marker
- Iron and board
Materials
- Matching thread
- Straight woven garment
- Pins or clips
Before you begin
Safety & limits
- Use an iron only at a care-label-safe setting on a stable board. Unplug it when finished. Do not alter flame-resistant or other protective garments without manufacturer guidance.
Work carefully, in order
The method
- 01
Fit before marking
Choose an ordinary straight woven trouser leg, sleeve or similar edge for this first method. Wear the usual shoes when checking trouser length and ask someone to mark the desired fold while you stand naturally. Remove the garment before sewing. Compare both sides from a reliable seam reference; do not assume two worn lower edges are already level.
- 02
Plan the two folds
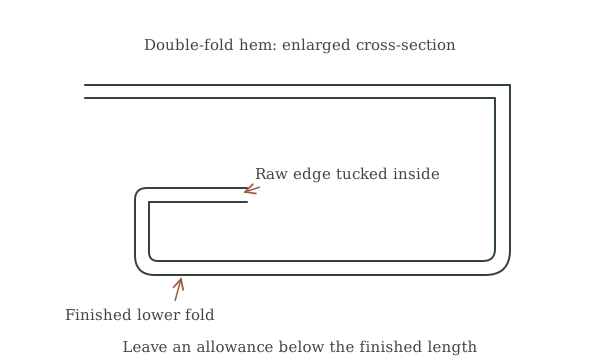
Mark the finished lower fold, then preserve enough cloth below it for a narrow first turn and a wider second turn. On a practice piece, a roughly 1 cm first turn and 2 cm second turn demonstrate the idea; actual allowances depend on bulk and available fabric. Pin the intended folds before cutting. Keep the original length when a reversible alteration is possible.
- 03
Press and baste
Check the care label and test heat on a hidden area, using a pressing cloth where needed. Fold the raw edge inward, then turn again so it is enclosed. Press without stretching. Hold the folds with loose temporary stitches and check the garment’s hang. A tapered opening may need a different hem treatment because the turned allowance can be too narrow to fit smoothly.
- 04
Attach the folded edge
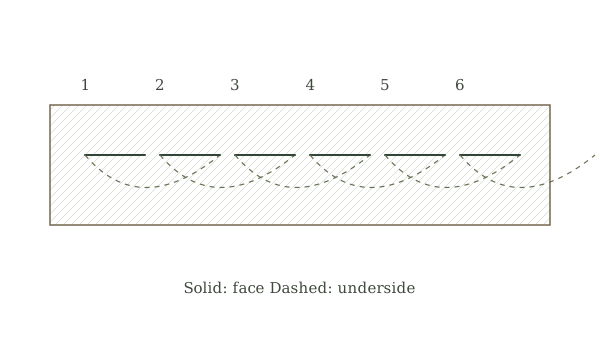
Work on the inside. Secure the thread within the hem allowance, take a tiny bite of the garment just above the fold, then travel a short distance inside the folded hem edge. Repeat around the opening with relaxed tension. Catch as little of the outer face as the fabric can support. Keep the far side of a sleeve or leg out of the needle’s path.
- 05
Check movement and finish
Before securing the last thread, let the garment hang and look for dimples on the outside. Flex the opening gently; the stitching should not act like a tight drawstring. Remove temporary basting, secure the thread in the allowance and press according to the label. Try the garment again. Keep the cut-off scrap for future matching repairs if shortening required trimming.
Mistakes to avoid
- Cutting at the finished fold line instead of below it.
- Applying a non-stretch hand hem to a knit opening that must stretch over a hand or foot.
If it isn’t working
A row of dimples shows outside
Undo the tight stitches, use smaller outer-fabric bites and leave the thread relaxed.
The folded allowance will not lie flat
Check for a tapered or curved edge; use a narrower suitable hem or ask a tailor rather than forcing excess fabric.
Then & now
Historical context
Hand hems made garment length adjustable before home sewing machines became widespread. Preserving an allowance also makes later lengthening and repair possible; the useful lesson is to leave room for change.
The modern equivalent
Machine blind hemming is faster on suitable garments. Stretch stitches, coverstitching and professional alterations serve fabrics or shapes outside this straight woven example.
Sources & review
Editorial draft — specialist review pending. Written 2026-09-21. Sources support the stated scope; this page has not been professionally certified.
- Royal School of Needlework — slip stitch ↗
Hidden stitch attachment between a fold and base fabric; not a complete garment-fitting specification. Checked 2026-09-21.