Why it matters
A test answers a specific question about a sample. It cannot explain an entire garden unless the sample represents the place you intend to manage. Treat the result as a decision aid, and keep the sampling map with the report so a later comparison means something.
What you’ll need
Tools
- Trowel
- Clean bucket
- Labels
- Notebook
Materials
- Laboratory sample bag
- Soil
Before you begin
Safety & limits
- Unknown fill, former industrial uses or suspected contamination need appropriate professional assessment. Wear gloves and wash hands after handling soil.
Work carefully, in order
The method
- 01
Choose the question and laboratory
Start with the crop you want to grow and the problem you want to understand. Ask the laboratory which package addresses that question, how deeply to sample, how much soil to send and whether to dry it. Routine fertility testing and contamination testing are different requests. Record the instructions before going outside.
- 02
Separate unlike areas
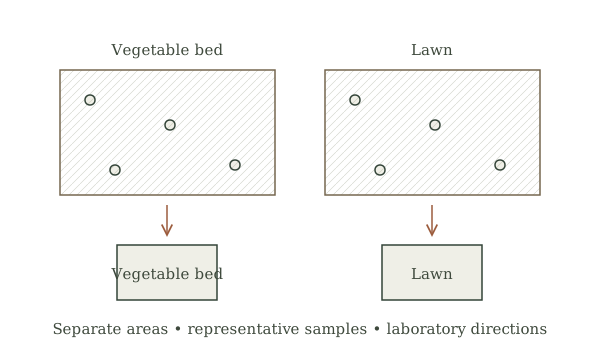
Sketch the beds and give each management area a short identifier. Keep a recently filled raised bed separate from old ground, and keep an unusual wet or poorly growing patch separate when investigating it. Mixing a problem patch with the rest can hide the difference you needed the test to explain.
- 03
Collect a representative sample
Use clean equipment and follow the laboratory’s prescribed sampling pattern and depth. Take comparable portions from several positions within one area, avoiding a recent fertilizer spill. Combine only those portions belonging to that area. This is sampling, not an excuse to dig around unknown buried services or contaminated ground.
- 04
Label and submit
Prepare the sample exactly as the laboratory requests. Put the area identifier on both bag and form, list the intended crop, and describe recent amendments. Photograph the completed form and note the sampling date. Keep the shipment record so you can connect an emailed result with the correct bed.
- 05
Turn the report into one plan
Read the units, crop assumptions and recommendation together. Ask the laboratory to clarify unfamiliar figures before buying amendments. Write down the product, measured bed area and proposed amount; check the arithmetic independently. Keep an untreated comparison area where practical and record later growth rather than assuming an application solved the problem.
Mistakes to avoid
- Combining unlike beds into one bag
- Ordering fertility testing when the concern is contamination
- Adding lime solely because plants look weak
If it isn’t working
The report does not match the garden
Check the label, sampling depth, crop code and units with the laboratory before acting.
A second report looks different
Compare sampling season, depth and laboratory methods; a number without those details is a weak comparison.
Then & now
Historical context
Careful observation and record keeping remain useful companions to laboratory analysis. A dark colour or a good crop last year cannot establish today’s nutrient needs.
The modern equivalent
Accredited laboratories provide measured results; a notebook or spreadsheet preserves the context needed to use them.
Sources & review
Editorial draft — sources checked; specialist review pending. Written 2026-09-20. Sources support the stated scope; this page has not been professionally certified.
- University of Minnesota Extension — soil testing ↗
Test scope, representative sampling and interpreting recommendations. Checked 2026-09-20.